


Why Your Floors Might Be Hiding a Moisture Problem
Here’s the thing about subfloor moisture — it’s sneaky. You won’t notice it until your new hardwood starts buckling or your laminate develops weird bubbles. And by then? You’re looking at a costly replacement.
I’ve seen homeowners spend thousands on beautiful flooring only to watch it fail within months. The culprit wasn’t the material or the installation crew. It was moisture lurking beneath the surface that nobody bothered to check.
If you’re planning a flooring project or noticing strange changes in your existing floors, this guide walks you through everything you need to know about detecting and fixing subfloor moisture issues. Whether you’re working with professionals for Flooring Services in Schiller Park or tackling a DIY project, understanding moisture is non-negotiable.
Warning Signs You’ve Got a Moisture Problem
Your floors actually tell you when something’s wrong. You just need to know what to look for.
Visual Clues That Scream “Moisture!”
Cupping happens when the edges of wood planks rise higher than the center. It looks like each board turned into a tiny shallow bowl. This means moisture is hitting the bottom of your flooring faster than the top can adjust.
Crowning is the opposite — the center of each plank puffs up while edges stay flat. Usually happens after cupping when the surface dries too quickly.
Buckling is the scary one. Your floor literally lifts off the subfloor. We’re talking inches of separation sometimes. This needs immediate attention.
Less Obvious Indicators
- Musty smells in rooms without obvious water damage
- Soft spots that give slightly when you walk
- Discoloration at baseboards or floor edges
- Laminate seams separating or swelling
- Tile grout that stays perpetually damp
Don’t ignore these. Seriously. A small moisture issue today becomes a major renovation next year.
Testing Methods That Actually Work
You can’t just eyeball moisture levels. Well, you can try, but you’d be guessing. And guessing with flooring rarely ends well.
The Calcium Chloride Test
This old-school method measures moisture vapor emission rate (MVER) from concrete slabs. You tape a small dish of calcium chloride to the floor, cover it with plastic, and wait 60-72 hours. The weight change tells you how much moisture is escaping.
According to concrete industry standards, readings above 3 pounds per 1,000 square feet over 24 hours spell trouble for most flooring types.
Pin Meters vs. Pinless Meters
Pin meters poke tiny holes in your subfloor and measure electrical resistance between two points. More moisture equals less resistance. They’re accurate but leave small marks.
Pinless meters scan without penetration using electromagnetic signals. Great for quick checks but can be thrown off by metal or varying material density.
For wood subfloors, you want readings below 12% moisture content. Concrete’s trickier — relative humidity inside the slab matters more than surface readings.
The Plastic Sheet Test
Budget option here. Tape a clear plastic sheet to your concrete floor, seal the edges, wait 24 hours. If condensation forms underneath or the concrete darkens, you’ve got moisture coming up.
It won’t give you exact numbers, but it tells you whether professional testing is worth the investment.
What’s Causing Your Moisture Problem
Fixing moisture means finding the source. Otherwise, you’re just treating symptoms.
Concrete Slab Issues
New concrete holds a surprising amount of water. A typical 4-inch slab needs months — sometimes over a year — to fully cure. Rushing flooring installation over “green” concrete is asking for disaster.
Ground moisture also migrates up through concrete without proper vapor barriers beneath the slab. Older homes often lack these barriers entirely.
Crawl Space and Basement Concerns
Humidity from exposed soil transfers directly into wood subfloors above. Poor ventilation makes it worse. That musty basement smell? Your floor joists are probably absorbing all that moisture.
Professionals like Global Home Improvement recommend checking crawl space conditions before any flooring project. What’s happening below your subfloor matters just as much as the subfloor itself.
Plumbing and HVAC Problems
Slow leaks under sinks, around toilets, or from supply lines soak into subfloors for weeks before you notice. Same with condensation from AC units or improperly insulated ductwork.
These usually create localized damage rather than whole-floor issues. If moisture problems appear in specific spots, start looking for pipe routes.
Solutions That Actually Solve the Problem
Once you know what you’re dealing with, fixing it becomes straightforward. Not necessarily cheap or easy — but straightforward.
Moisture Barriers and Vapor Retarders
For concrete slabs, you’ve got options:
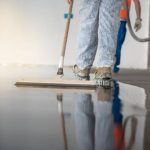
- Sheet barriers: 6-mil polyethylene laid over concrete before subfloor installation
- Liquid-applied membranes: Paint-on products that create seamless barriers
- Epoxy coatings: Two-part systems that seal and strengthen concrete surfaces
Wood subfloors over crawl spaces need different treatment. Vapor barriers on the ground below, proper ventilation, and sometimes encapsulation of the entire crawl space.
Subfloor Replacement
Sometimes moisture damage goes too deep. Soft, punky plywood or OSB won’t hold fasteners properly. Mold-contaminated material creates health hazards.
Replacement isn’t fun. It means tearing up sections, sistering damaged joists if needed, and installing fresh sheathing. But skipping this step when it’s necessary just delays the inevitable.
Environmental Controls
Dehumidifiers work wonders in basements and enclosed spaces. You want indoor humidity between 30-50% for most flooring types. Monitor it with a cheap hygrometer.
Proper grading outside matters too. Water should flow away from your foundation, not toward it. Sometimes solving floor moisture means fixing drainage issues twenty feet from your house.
Matching Flooring to Moisture Conditions
Some materials handle moisture better than others. If you can’t completely eliminate moisture concerns, choose flooring that tolerates them.
| Flooring Type | Moisture Tolerance | Best Applications |
|---|---|---|
| Luxury Vinyl Plank | Excellent | Basements, bathrooms, kitchens |
| Ceramic/Porcelain Tile | Excellent | Any moisture-prone area |
| Engineered Hardwood | Moderate | Grade-level with proper barriers |
| Solid Hardwood | Poor | Above-grade only, controlled humidity |
| Laminate | Poor | Dry areas only |
Flooring Services in Schiller Park handle moisture assessments daily. Getting professional input before selecting materials saves headaches later.
Frequently Asked Questions
How long should concrete cure before installing flooring?
Industry standards say at least 30 days per inch of slab thickness, but testing matters more than time. A 4-inch slab might need 60-90 days minimum, though some take longer depending on climate and ventilation. Always test moisture levels regardless of cure time.
Can I install flooring over slightly elevated moisture readings?
Sometimes, with proper precautions. Specific moisture barriers, moisture-tolerant flooring materials, and manufacturer approval all play into this decision. But “slightly elevated” needs definition — there’s a big difference between borderline readings and clearly problematic ones.
Will a dehumidifier solve my subfloor moisture problems?
It helps with ambient humidity but won’t fix moisture migrating through concrete or coming from plumbing leaks. Dehumidifiers work best as part of a broader solution that addresses moisture sources directly. You can learn more about home improvement solutions for various moisture-related concerns.
How do I know if mold has developed in my subfloor?
Musty odors, visible discoloration when you pull up flooring, and allergic symptoms that worsen indoors all suggest mold presence. Professional testing confirms it. If you suspect mold, don’t disturb the area yourself — disturbance releases spores into your breathing air.
Is moisture testing worth the cost before new flooring installation?
Absolutely. Testing costs maybe $200-400 from professionals. Replacing failed flooring costs thousands, plus the hassle of living through another installation. It’s genuinely one of those situations where prevention beats cure every time.
Getting your subfloor moisture situation sorted before installation protects your investment and keeps your floors looking good for years. Don’t skip this step — your future self will thank you.


Leave a comment