


Automotive

How to Fix Auto Paint Scratches Like a Pro

How to Repair Auto Paint Scratches

A minor scratch isn’t just cosmetic—it exposes your paint system to sun, moisture, and road grime, which can snowball into oxidation, rust, and even ding resale value. The good news: with a measured approach, the right materials, and a clean workspace, you can also restore gloss, seal the finish, and keep your car looking new. In the next few minutes, you’ll learn to identify scratch depth, choose the correct method, and execute clean, durable repairs. So, you’ll know how to repair auto paint scratches efficiently, safely, and without overspending.

Scratch Types & How To Repair Auto Paint Scratches

Before you touch a polishing pad, confirm what you’re dealing with. Your vehicle’s finish is a layered system: clear coat (gloss/UV protection), base coat (color), primer (adhesion/seal), and finally the metal or plastic substrate. The table below shows what to do based on depth.

Scratch typeDepth tell-taleDIY difficultyCore fixTypical time
Clear coat scuffNail doesn’t catch; no color changeEasyPolish or light compound, then seal20–40 min
Base coat scratchNail lightly catches; color looks dull/whiteModerateTouch-up paint + level + polish60–120 min
Primer/deepMetal/primer visible; nail digs inAdvancedFill/paint/level; may need pro2–4 hrs. (DIY)
Rock chipsPinpoint craters on front surfacesModerateTouch-up + clear build + level45–90 min
Keyed panels/large damageLong, jagged grooves across panelsHardMulti-stage, pro respray likely1–3 days (shop)

What You’ll Need to Start — How to Repair Auto Paint Scratches

Use clean, quality tools so you remove defects—not add new ones.

  • Workstation basics: shade, good lighting, nitrile gloves, masking tape, soft fender cover.
  • Washing & prep: pH-balanced car wash soap, two buckets with grit guards, microfiber wash mitt, drying towels, isopropyl alcohol (IPA) mix (10–20%) for final wipe.
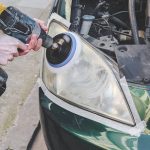
  • Abrasives & leveling: 1000- and 2000-grit wet/dry sandpaper, a small foam sanding block, and a fine/ultrafine rubbing compound.
  • Polishing and protection: Finishing polish, microfiber or foam applicators, a dual-action (DA) polisher, and quality wax or paint sealant.
  • Color correction: OEM-code touch-up paint (pen, bottle, or aerosol), ultra-thin brush/toothpick, and clear coat (pen or aerosol) for building gloss.
  • Detailing aids: panel wipe, tack cloth, and plastic razor blades for cleaning edges without marring.

Step-by-Step Repairs For Scratch Depth

These steps give you a precise, repeatable process. Work slowly, check your progress often, and stop when the defect is removed. You’ll master how to repair auto paint scratches without over-thinning the clear.

A) Clear Coat Scuffs (Door Handle Cups, Shopping-Cart Kisses)

  1. Wash & decontaminate. Thoroughly wash, then wipe the spot with a light IPA mix to remove waxes that could clog your pad.
  2. First, test the spot. Then, a pea-sized drop of fine compound was applied using a foam applicator. Work a 10 × 10 cm area in overlapping passes for ~30 seconds.
  3. Inspect. Wipe clean. If the haze diminishes but persists, make one shorter pass. Avoid heat buildup; keep the pad moving.
  4. Refine. Follow with finishing polish to restore optical clarity.
  5. Seal. Apply wax or sealant to protect the corrected area.

Why it works: You’re leveling the top microns of clear coat so the scratch is no longer a valley that scatters light.

B) Base Coat Scratches (Branch Rubs, Larger Debris)

When you can faintly feel the mark with a fingernail but don’t see bare metal, touch-up paint plus leveling is your path. Here’s how to repair auto paint scratches at this depth:

  1. Clean & mask. Wash, de-wax with IPA, and mask an outline around the scratch so you keep the product where it belongs.
  2. Color match. Confirm the OEM paint code (driver-door jamb or owner’s manual). Shake the bottle or pen thoroughly.
  3. Paint application. With a fine brush or toothpick, wick tiny amounts of color into the scratch—don’t flood it. Capillary action should fill the groove. Let it flash, then apply additional thin passes until the color is just shy of flush.
  4. Cure. Allow the color to dry fully per the manufacturer (often a few hours or overnight).
  5. Build clearly. Add 2–3 thin coats of clear to rise slightly above the surrounding surface—this “proud” layer gives you material to level perfectly.
  6. Level. Wet lightly sand with 2000-grit on a small foam block using soapy water. Keep strokes short and localized until the repair is flush.
  7. Polish. Use a compound to remove sanding haze, then a finishing polish for gloss.
  8. Seal. Protect with wax/sealant to ensure even water behavior across the panel.

Key caution: The curing time wasn’t sufficient if the color lifted onto your towel while wiping. Pause and let it harden.

C) Primer/Deep Scratches

Deep grooves expose primer or metal, which can rust. You can DIY small sections, yet large or complex panels are often better left to a body shop.

  1. Feather edges. Sand jagged paint edges with 1000-grit to create a smooth, tapered trough.
  2. Prep & protect. Clean with panel wipe; mask edges and trim. If bare metal is visible, apply a thin etching primer touch-up to prevent corrosion, then allow it to dry.
  3. Color and fill. Apply color in multiple thin passes. If the trough is deep, use a compatible filler/putty first, level it, and then color.
  4. Clear build. Stack clear layers until the repair sits slightly proud of the surrounding finish.
  5. Block level. Wet sand with 2000-grit on a small block to flatten the repair flush with the panel. Keep the surface wet and check often.
  6. Compound & polish. Remove micro-marring and restore clarity.
  7. Final protection. Seal the area and inspect in direct and diffused light.

If the scratch crosses body lines or is longer than ~20–25 cm, a pro respray may be faster, more uniform, and cost-effective long-term.

Common Mistakes and How to Avoid Them

  • Skipping wash/decon: Dirt on the surface becomes fresh scratches under your pad—always clean first.
  • Too much pressure: Pressing harder doesn’t fix faster; it just thins the clear coat and adds haze. Let abrasives work.
  • Rushing cure times: Touch-ups that aren’t fully cured will smear during leveling. Wait as directed.
  • Over-sanding: Sand only the high spot of the repair, not the whole panel. Use a small block and short strokes.
  • Wrong compound/pad: Heavy-cut products on soft clear can micro-mar; test fine first, then step up only if needed.
  • No protection afterward: Unsealed corrections re-oxidize faster; always finish with wax or sealant.

Cost And Professional Repair Timeline For Paint Scratches

The price of professional scratch repair depends on the depth and size of the damage. Minor spot treatments, such as polishing clear coat scuffs or filling a few chips, usually cost $100–$300. Larger jobs, like deep base coat scratches or multi-panel blends, range between $500 and $1,500+, depending on the paint type, labor, and materials.

Timeline also varies by severity. Small clear coat corrections can often be done in less than an hour, while touch-up and leveling may take a few hours to a full day. For deeper scratches that require primer, filler, or a full respray, shops usually need 1–3 days, especially if multiple coats or drying cycles are involved.

Tip: Mobile detailers can handle light to moderate scratches at your driveway, saving time, while body shops remain the best choice for deep or widespread damage.

When to DIY vs. Call a Pro

You can learn how to repair auto paint scratches for small, localized defects. Yet there’s a point of diminishing returns:

  • The DIY sweet spotis isolated, clear scuffs, a few rock chips, or short base-coat lines on flat areas. Expect to spend the price of compounds, pads, and paint pens.
  • Shop territory: large keyed panels, damage on sharp creases, tri-coat pearls across big areas, or any repair that exposes metal over a wide region. Professional body shops can blend adjacent panels so that metallic flake orientation and gloss match seamlessly, which is difficult at home.

Typical costs vary by region and size, but minor pro spot repairs may range from $100–$300, while multi-panel blends can reach $500–$1,500+, depending on materials and labor. Meanwhile, mobile detailers can perform polishing and light touch-ups at your driveway, saving time.

Care That Prevents Scratches

Prevention is faster and cheaper than correction. Initially, establish a wash routine: use a two-bucket method, soft mitt, separate wheels bucket, and blot-dry with plush microfiber. Next, keep 6–8 car lengths behind gravel-flinging trucks; avoid tailgating on newly resurfaced roads. Additionally, park away from cart corrals and under cover when possible. Finally, maintain a sacrificial layer—quality wax or sealant—every 2–4 months (or a ceramic coating for year-round protection).

As you build good habits, you’ll also need to figure out how to repair auto paint scratches, and your chances of getting them repaired will drop dramatically.

Troubleshooting: If the Repair Still Shows

Sometimes a line remains visible at certain angles. Consequently, ask yourself:

  • Is the scratch level? If not, add one clearer coat layer and re-level gently.
  • Is the color off? Recheck the paint code; many colors have multiple variants by factory lot.
  • Is there sanding haze? Step down to a finer polish and also slow your arm speed.
  • Is the panel plastic? You may see texture (“orange peel”) that requires careful refinement, not just gloss.

If you’ve tried these and the defect still pops up under bright sun, consult a professional for a blend.

Final Checklist + Timeline

  • Day 0 (evening): Wash, de-wax, assess, and stage tools.
  • Day 1 (morning): Perform clear-coat polishing or apply base-coat touch-up in thin layers.
  • Midday: If needed, add more color; let it fully flash.
  • Afternoon: Build clear to slightly proud, then pause.
  • Day 2: Wet-sand lightly, compound, polish, and seal.
  • Week 1: Wash gently. Admire the uniform gloss and note that you now know how to repair auto paint scratches correctly.

FAQs

Can I fix deep scratches on my car at home?

Yes, small deep scratches can be repaired with filler, primer, touch-up paint, and clear coat, but large or complex damage is best left to a professional.

How much does professional scratch repair usually cost?

Minor spot repairs may cost $100–$300, while larger resprays or multi-panel blends can range from $500 to $1,500+.

How do I know if my scratch only needs polishing?
If your fingernail doesn’t catch and there’s no color change, it’s likely a clear-coat scuff that can be polished out.

Drive Away with Confidence

Scratches happen—to careful drivers, too. Nevertheless, armed with a thoughtful plan, you can diagnose depth, choose the lightest effective method, and execute a tidy repair that blends in and endures. Furthermore, with smart washing, mindful driving distance, and regular protection, you’ll spend far less time fixing and far more time enjoying a clean, glossy car. And because you’ve learned exactly how to repair auto paint scratches, you’ll be ready when the next little scuff inevitably appears.

Written by
exploreseveryday

Explores Everyday is managed by a passionate team of writers and editors, led by the voice behind the 'exploreseveryday' persona.

Leave a comment

Leave a Reply

Your email address will not be published. Required fields are marked *

Related Articles

Mobile Mechanic Dallas, TX
Automotive

Mobile Mechanic Dallas, TX: When to Choose On-Site Service Over a Traditional Auto Repair Shop

Your car breaks down, and you immediately face a decision: call a...

How Air Duct Cleaning Impacts Your HVAC System Performance in Sevierville When your heating and cooling system struggles to maintain comfortable temperatures or your energy bills creep upward without explanation, the problem might be hiding in plain sight. Your air ducts, the network of pathways that deliver conditioned air throughout your home, accumulate dust, debris, and contaminants over time. For homeowners in Sevierville, where seasonal temperature swings demand reliable climate control, understanding the connection between clean ductwork and system performance can save you money and extend the life of your equipment. Many property owners overlook duct maintenance until a major system failure forces their hand. The reality is that regular attention to your ductwork directly affects how efficiently your HVAC system operates. Clean ducts mean better airflow, reduced strain on mechanical components, and fewer repair calls. This guide explores how professional air duct cleaning service in Sevierville, TN can transform your system's performance and what you need to know about maintaining the entire system for optimal results. The Hidden Connection Between Dirty Ducts and System Efficiency Your HVAC system works as an integrated whole. When one component underperforms, the entire system compensates. Dirty ductwork forces your furnace or air conditioner to work harder to push air through restricted passages. This extra effort translates directly into higher energy consumption and accelerated wear on motors, fans, and compressors. Think of your ductwork like arteries in a circulatory system. When blockages develop, the heart must pump harder to maintain blood flow. Similarly, when dust and debris coat duct interiors, your blower motor strains to maintain adequate airflow. This increased resistance not only reduces comfort in individual rooms but also shortens the lifespan of expensive mechanical components. An HVAC contractor in Sevierville, TN who specializes in comprehensive system care will assess both ductwork cleanliness and mechanical function during routine visits. The impact shows up in measurable ways. Systems with heavily contaminated ducts can experience airflow reductions of 20 to 40 percent. That lost capacity means longer run times to reach desired temperatures, which directly increases your utility costs. Beyond energy waste, restricted airflow causes uneven heating or cooling, creating hot and cold spots that no thermostat adjustment can fix. Common Contaminants That Compromise Performance Dust and Particulate Matter Household dust is the most common duct contaminant. It enters through return vents and accumulates on interior surfaces. While some dust is inevitable, excessive buildup creates insulating layers that reduce thermal transfer efficiency. When dust coats evaporator coils and heat exchangers within the system, it acts as a blanket, preventing proper heat exchange and forcing longer operating cycles. Mold and Moisture Accumulation Sevierville's humid climate creates ideal conditions for mold growth inside ductwork, especially if condensation occurs due to temperature differentials or system inefficiencies. Mold not only affects indoor air quality but also degrades duct materials over time. The presence of biological growth often indicates underlying moisture problems that require attention as part of HVAC system repair and maintenance in Sevierville, TN. Construction Debris and Foreign Objects Homes that have undergone renovations frequently have construction dust, drywall particles, and even small tools or materials left inside ductwork. New construction properties often have substantial debris that accumulated during the building process. These materials create significant blockages and can damage system components if pulled into the blower assembly. When to Schedule Professional Duct Cleaning Most experts recommend professional air duct cleaning service in Sevierville, TN every three to five years for typical households. However, certain circumstances warrant more frequent attention. If you notice visible dust puffing from vents when the system starts, detect musty odors when running heating or cooling, or observe excessive dust accumulation on furniture despite regular cleaning, your ducts likely need professional attention. Homes with pets, smokers, or family members with allergies or respiratory conditions benefit from more frequent cleaning, typically every two to three years. After any home renovation project, schedule a duct inspection and cleaning to remove construction debris before it circulates through your living spaces. Recent water damage or flooding also necessitates immediate duct evaluation, as moisture creates conditions for rapid mold development. Pay attention to system performance changes. If some rooms suddenly become harder to heat or cool, or if your energy bills increase without corresponding weather changes or usage patterns, compromised ductwork might be the culprit. These symptoms often appear gradually, making them easy to dismiss until they become severe enough to demand attention. The Professional Cleaning Process Legitimate duct cleaning involves more than running a vacuum through your vents. Professional technicians use specialized equipment including high-powered vacuum systems, rotating brushes, and compressed air tools to dislodge and remove contaminants throughout the entire duct system. The process typically begins with a visual inspection using cameras to assess contamination levels and identify any structural issues. Technicians create negative pressure within the duct system using a large vacuum unit, then methodically clean each branch while the vacuum captures dislodged materials. This prevents contaminants from spreading into living areas during the cleaning process. Quality providers also clean supply and return registers, the plenum, and accessible portions of the HVAC equipment itself. Be cautious of providers offering suspiciously low prices or claiming duct cleaning cures all health problems. Reputable professionals provide transparent pricing, explain their process in detail, and coordinate cleaning with broader HVAC system repair and maintenance in Sevierville, TN to address any mechanical issues discovered during the work. Maintaining System Performance Between Cleanings Professional duct cleaning delivers the deepest results, but homeowners can take steps to maintain cleanliness between service visits. The single most important action is regular filter replacement. Most systems require new filters every one to three months depending on filter type and household conditions. High-quality pleated filters capture more particulates before they enter ductwork, but they also require more frequent replacement than basic fiberglass filters. Keep return and supply vents clear of furniture and curtains to maintain proper airflow. Vacuum register covers monthly to prevent dust buildup from being drawn into the system. During cleaning, avoid using chemical sprays or harsh cleaners near vents, as these products can be pulled into ductwork and distributed throughout your home. Control indoor humidity levels, ideally keeping them between 30 and 50 percent. This range discourages mold growth while maintaining comfort. Use bathroom and kitchen exhaust fans to remove moisture at the source, reducing the humidity load on your HVAC system. Address any water leaks promptly, as even small amounts of moisture can create problems inside ductwork over time. Coordinating Duct Cleaning with System Maintenance The most effective approach combines duct cleaning with comprehensive system maintenance. When an HVAC contractor in Sevierville, TN performs routine maintenance, they can identify duct issues and recommend cleaning when truly necessary rather than on an arbitrary schedule. This integrated approach catches problems early, before they escalate into expensive repairs or system failures. During maintenance visits, technicians inspect ductwork connections, seal leaks, and verify proper insulation. These factors significantly impact system efficiency. Even spotlessly clean ducts deliver poor performance if joints leak conditioned air into attics or crawl spaces. Combining duct cleaning with maintenance ensures both clean pathways and tight, efficient distribution of heated or cooled air. Schedule duct cleaning for shoulder seasons, spring or fall, when you are less dependent on heating or cooling. This timing allows for thorough work without compromising comfort. It also positions your system for peak performance heading into the most demanding months of summer heat or winter cold. Final Thoughts on Protecting Your Investment Your HVAC system represents a significant investment in home comfort and property value. Clean ductwork is not just about air quality; it is fundamental to system efficiency, longevity, and reliable performance. By understanding how contaminated ducts impact mechanical components and energy consumption, you can make informed decisions about when professional cleaning makes sense for your situation. Whether you are addressing immediate performance problems or taking a proactive approach to system care, working with qualified professionals ensures results that actually improve your home environment. For Sevierville residents looking for comprehensive system care, Breathe Fresh LLC combines expert duct cleaning with thorough maintenance services, helping homeowners maximize comfort while minimizing energy costs and repair needs. Taking a holistic view of your HVAC system, from ductwork to mechanical components, pays dividends in lower bills, better comfort, and equipment that serves you reliably for years to come. Frequently Asked Questions How long does professional duct cleaning take for an average home? A thorough professional duct cleaning typically takes between two and four hours for an average-sized home. The exact duration depends on factors including system size, accessibility of ductwork, contamination levels, and whether any repairs or modifications are needed. Larger homes with multiple HVAC systems or extensive ductwork may require additional time. Quality providers focus on completeness rather than speed, ensuring all branches receive proper attention. Can dirty ducts actually damage my HVAC equipment? Yes, contaminated ductwork can cause real damage to HVAC components over time. Restricted airflow forces blower motors to work harder, leading to premature failure. Dust drawn into the system can coat evaporator coils and heat exchangers, reducing efficiency and potentially causing overheating. In extreme cases, debris can damage fan blades or clog condensate drains. Regular cleaning prevents these problems and extends equipment lifespan significantly. How much can I expect to save on energy bills after duct cleaning? Energy savings vary based on initial contamination levels and overall system condition. Homes with heavily contaminated ductwork may see energy consumption reductions of 10 to 20 percent after professional cleaning. However, duct cleaning alone does not guarantee savings if other system problems exist. The greatest benefits come from combining duct cleaning with regular maintenance, proper insulation, and sealed duct connections to create an efficient overall system. What is the difference between duct cleaning and regular HVAC maintenance? Regular HVAC maintenance focuses on mechanical components like motors, coils, refrigerant levels, and electrical connections to ensure proper system operation. Duct cleaning specifically addresses contaminants inside the air distribution pathways. Both services are important but serve different purposes. The most effective approach combines both, with annual or semi-annual maintenance visits and duct cleaning every few years or as needed based on household conditions and usage patterns. Are there any risks to having my ducts cleaned? When performed by qualified professionals using proper equipment, duct cleaning is safe and beneficial. However, improper techniques can damage ductwork, dislodge asbestos insulation in older homes, or spread contaminants instead of removing them. Always verify that your provider follows industry standards, uses appropriate negative pressure systems, and has experience with your type of ductwork. Avoid providers who suggest unnecessary chemical treatments or make exaggerated health claims about the benefits of cleaning.
ConstructionAutomotive

How Air Duct Cleaning Impacts Your HVAC System Performance in Sevierville

When your heating and cooling system struggles to maintain comfortable temperatures or...

Joe's RV Service
Automotive

Finding a Reliable RV Mechanic in Buckeye, AZ for Hydraulic Jack Repairs and More

When your RV’s hydraulic leveling jacks start acting up or refuse to...

Automotive

When to Remove a Tree Stump and Address Hazardous Trees in Evergreen, CO

Living in Evergreen means enjoying the natural beauty of mature trees and...