


That Mysterious Leak Probably Isn’t Your Shingles
You’ve got a water stain on your ceiling. Maybe it shows up after heavy rain, or perhaps it appears when snow melts. You call someone out, they patch a few shingles, and you think you’re done. Then three months later? The stain’s back. Sound familiar?
Here’s the thing most homeowners don’t realize — about 90% of roof leaks have nothing to do with damaged shingles. The real culprit is usually flashing failure. And if you’re dealing with a persistent leak, understanding where water actually enters your roof can save you thousands in repeated repairs and water damage restoration.
If you’re searching for Residential Roofers in Millsboro DE, knowing the difference between a shingle problem and a flashing problem helps you ask the right questions and get the right fix the first time.
What Exactly Is Roof Flashing?
Flashing is thin metal (usually aluminum, copper, or galvanized steel) installed at every joint, intersection, and penetration on your roof. Think of it as the waterproof seal between your shingles and everything that pokes through or meets your roof surface.
Your roof isn’t one continuous surface. It has chimneys, vents, skylights, dormers, and walls that interrupt the shingle field. Water naturally flows toward these interruptions. Without proper flashing, that water goes straight into your home.
The problem? Flashing is often the first thing to fail on an otherwise healthy roof. And when it does, the leak can show up feet away from the actual entry point, making diagnosis tricky for anyone without experience.
Eight Critical Flashing Locations You Should Know
Chimney Flashing
Chimneys are leak magnets. They require both step flashing along the sides and counter flashing embedded into the mortar joints. When either fails — and they often do — water runs down behind your shingles where you can’t see it. Residential Roofers Millsboro homeowners trust understand that chimney flashing needs inspection at least yearly.
Valley Flashing
Roof valleys channel massive amounts of water during storms. Open valleys use exposed metal flashing, while closed valleys weave shingles together. Either way, if the underlying flashing separates or corrodes, you’ve got a direct path into your attic.
Skylight Flashing
Skylights are notorious for leaking. The flashing system around them involves multiple components, and one weak point compromises everything. Many skylight leaks get blamed on the skylight itself when it’s actually the surrounding flashing that failed.
Vent Pipe Flashing
Those pipes sticking up through your roof for plumbing vents use rubber boot flashing. The rubber degrades from UV exposure and temperature changes. After 10-15 years, these boots crack and let water pour in around the pipe.
Step Flashing
Wherever your roof meets a vertical wall — like a dormer or a second-story wall — step flashing should be woven between each shingle row. Shortcuts here are common. Some installers skip pieces or nail through the visible face, creating leak points.
Drip Edge
This L-shaped metal runs along your eaves and rakes. It directs water into your gutters and protects the wood underneath. Missing or damaged drip edge lets water wick back under your shingles through capillary action.
Dormer Flashing
Dormers combine multiple flashing challenges in one spot. They’ve got corners, valleys, and wall intersections all meeting together. One piece installed incorrectly and you’ve got water problems inside that dormer wall.
Wall Intersections
Where your roof meets a wall — whether it’s an addition, a porch cover, or part of your main structure — requires kickout flashing to direct water away from the wall. Missing kickout flashing is probably the most common installation mistake, and it causes serious damage inside walls that stays hidden for years.
Signs Your Flashing Has Failed
You probably can’t get on your roof safely to inspect flashing up close. But you can spot warning signs from the ground or inside your home:
- Water stains that appear near where your roof meets walls, chimneys, or other structures
- Visible rust streaks running down from roof penetrations
- Flashing pieces that look lifted, bent, or separated
- Caulk or tar visible from the ground (often a sign of a previous failed repair)
- Leaks that only happen during wind-driven rain
- Musty smells in rooms directly below roof intersections
According to weatherproofing standards, proper flashing installation requires specific overlap dimensions and material choices based on your climate and roof design.
Why Re-Roofing Over Old Flashing Guarantees Future Leaks
This happens way too often. A contractor gives you a great price on a re-roof, and part of why it’s cheap is they’re planning to leave existing flashing in place and just shingle over it.
Bad idea. Really bad idea.
Old flashing has already experienced years of thermal expansion and contraction. The sealants have dried out. Rust may have started underneath where you can’t see it. When you put new 30-year shingles over 15-year-old flashing, guess what fails first?
For dependable Residential Roofing Services near Millsboro, always confirm that your estimate includes complete flashing replacement — not just covering up what’s already there. Steve Martin Contracting emphasizes full flashing replacement because it’s the only way to match your new shingles’ lifespan.
Flashing Material Comparison
Not all flashing performs equally. Here’s what actually matters:
Aluminum: Lightweight, doesn’t rust, relatively affordable. Works great for most applications but can corrode when touching certain metals or concrete. Most common choice for residential work.
Copper: Lasts basically forever, looks great, develops a protective patina. Costs significantly more but adds value to high-end homes. Excellent around chimneys where durability matters most.
Galvanized Steel: Strong and affordable but eventually rusts in humid climates. The zinc coating wears off over time, especially in coastal areas. Not the best choice for Delaware homes near water.
Lead: Still used for some chimney applications because it’s easily shaped. Very long-lasting but expensive and raises environmental concerns during removal.
Cost Comparison: Fix It Now or Pay Later
Repairing or replacing flashing on an existing roof typically costs between $200-$500 per location, depending on accessibility and materials. That might sound like money you’d rather not spend.
But consider what happens when flashing fails and water gets in:
- Rotted roof decking replacement: $500-$1,500 per section
- Drywall repair and painting: $300-$800 per room
- Mold remediation: $1,500-$5,000 depending on spread
- Insulation replacement: $400-$1,200 for affected areas
- Structural repairs: Potentially thousands more
A $300 flashing repair that you skip can easily turn into a $5,000 problem within a year or two. Water damage compounds fast, and insurance companies are getting stricter about denying claims for “maintenance neglect.”
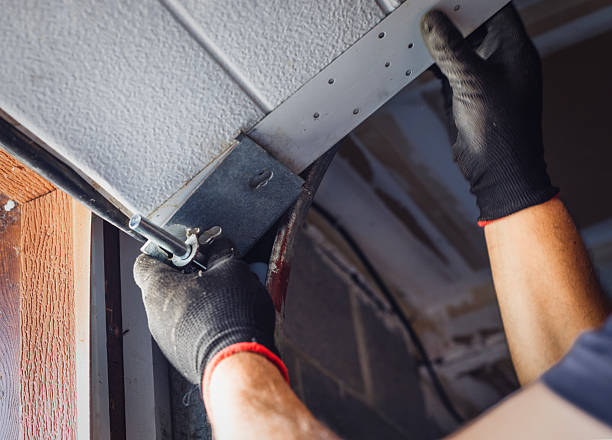
What Proper Flashing Installation Looks Like
When Residential Roofers in Millsboro DE install flashing correctly, they follow specific techniques that separate quality work from shortcuts:
- Step flashing woven with each shingle course, not just laid on top
- Counter flashing embedded into mortar joints at least 1 inch deep
- Overlaps of 4+ inches between flashing pieces
- Kickout flashing at every wall intersection
- Proper sealant application (not just caulk slapped over gaps)
- Drip edge installed under the underlayment at eaves, over it at rakes
Ask potential contractors about these specifics. Their answers tell you a lot about their quality standards.
Frequently Asked Questions
How long does roof flashing typically last?
Aluminum and copper flashing can last 20-30 years when properly installed. Galvanized steel might only last 15-20 years, especially in humid climates. Rubber vent boots usually need replacement every 10-15 years regardless of other flashing conditions.
Can I repair roof flashing myself?
Honestly, most flashing repairs require working on a sloped roof surface, which is dangerous without proper equipment. Small fixes like resealing a vent boot might be DIY-friendly, but anything involving step flashing or chimneys really needs professional attention. For more helpful resources on home maintenance decisions, research what’s actually safe to tackle yourself.
Why does my roof leak only during certain storms?
Wind-driven rain exposes flashing gaps that normal rainfall doesn’t reach. When rain comes in at an angle, it can push under lifted flashing or through small separations that stay dry during straight-down rain. This often indicates step flashing or counter flashing problems.
Should flashing be replaced during a roof replacement?
Absolutely yes. New shingles over old flashing is asking for trouble. The small extra cost to replace all flashing during a re-roof is basically insurance against having to tear into that new roof to fix leaks within a few years.
What’s the most common flashing mistake contractors make?
Skipping kickout flashing at wall-to-roof transitions. This single mistake causes more hidden water damage than probably any other roofing error. Water runs down the roof, hits the wall, and has nowhere to go except behind your siding where it rots out wall framing for years before anyone notices.


Leave a comment