


You spend hours scrubbing your tile floors, only to watch a cloudy white film appear as they dry. It’s one of the most frustrating experiences homeowners face when trying to maintain their flooring. That chalky residue makes your tiles look worse than before you started cleaning.
This problem happens more often than you think. The white haze isn’t a sign that your tiles are damaged—it’s usually the result of common cleaning mistakes or water quality issues. Understanding what causes this residue helps you prevent it from happening again.
Here’s what works: the right combination of proper cleaning solutions, correct water ratios, and thorough rinsing techniques. When you know what’s creating that white film, you can choose better cleaning methods and get the sparkling results you want. Professional Affordable Tile Cleaning Services in Fort Lauderdale FL understand these issues and use specialized equipment to avoid residue problems entirely.
Hard Water Minerals Create Stubborn White Films
Hard water is the biggest culprit behind white residue on tiles. When water contains high levels of calcium and magnesium, these minerals don’t evaporate—they stay behind as a visible white film. The harder your water, the more noticeable this buildup becomes.
Every time you mop with hard water, you’re essentially painting your floor with dissolved minerals. As the water dries, those minerals crystallize on the surface. This creates that chalky appearance that no amount of buffing seems to remove.
According to water quality research, over 85% of homes deal with some level of water hardness. The severity varies by region, but the impact on cleaning results remains consistent. You might not notice hard water in your drinking glass, but it shows up immediately on tile surfaces.
Testing your water helps you understand what you’re working with. Simple test strips from hardware stores reveal your water’s mineral content. Once you know you have hard water, you can adjust your cleaning approach accordingly.
Soap and Detergent Buildup Leaves Visible Streaks
Using too much cleaning solution causes more problems than it solves. When soap concentration exceeds what water can properly rinse away, the excess dries as a filmy residue. This happens with both commercial cleaners and homemade solutions.
Think about it this way: more soap doesn’t mean cleaner floors. The proper water-to-cleaner ratio matters more than the amount of product you use. Most people pour cleaner directly onto floors or use overly concentrated mop water.
The soap molecules bond with dirt particles, but they need adequate water to carry them away. Without sufficient rinsing, those soap-dirt combinations dry on your tiles as a sticky, white layer. This layer actually attracts more dirt over time, creating a cycle of increasingly cloudy floors.
Reading product labels gives you exact dilution ratios. Following these measurements prevents residue while still providing effective cleaning power. Less is genuinely more when it comes to floor cleaning solutions.
Improper Rinsing Techniques Leave Cleaning Agents Behind
You might be cleaning thoroughly but rinsing inadequately. A single pass with a damp mop doesn’t remove all the cleaning solution from tile surfaces. The residue that remains becomes that white film once everything dries.
Professional Tile Cleaning Services in Fort Lauderdale FL use multi-step rinsing processes with fresh water changes. They understand that the rinse cycle matters as much as the initial cleaning. Home cleaning often skips this crucial step entirely.
Your rinsing water should run clear before you consider the job complete. If you’re still seeing suds or cloudy water after mopping, cleaning agents remain on your floor. That contaminated water leaves behind the minerals and soap causing your residue problem.
Change your rinse water at least twice during floor cleaning. The first rinse removes most cleaning solution, while the second pass catches what remains. This simple extra step eliminates most white residue issues.
Wrong Product Choices for Your Specific Tile Type
Not all tiles tolerate the same cleaning products. What works perfectly on ceramic might leave natural stone covered in white streaks. Using acidic cleaners on certain tiles causes etching that looks like white residue but is actually surface damage.
Porcelain, ceramic, and natural stone each require different pH levels in cleaning solutions. Natural stone especially needs neutral or alkaline cleaners—never acidic formulas like vinegar or lemon-based products. These acids react with stone minerals, creating a permanent white haze.
Reading your tile manufacturer’s recommendations prevents costly mistakes. Most tiles come with care instructions that specify compatible cleaning products. Following these guidelines protects your investment while ensuring clean, residue-free results.
When in doubt, stick with pH-neutral cleaners designed for multiple tile types. These versatile products clean effectively without the chemical reactions that cause white films. They cost slightly more but save you from residue headaches.
Wax-Based Products Create Lasting Buildup
Some cleaning products contain waxes or polymers that promise extra shine. While they deliver initial gloss, these ingredients build up over time as white or yellow layers. Each application adds another thin coating that eventually becomes visible.
Wax buildup feels slightly sticky to the touch and attracts dirt rapidly. You’ll notice your floors getting dirty faster between cleanings. The buildup also makes tiles look dull rather than reflective, defeating the purpose of the shine-enhancing product.
Removing wax buildup requires specialized stripping solutions that dissolve these polymer layers. Regular mopping won’t touch wax residue—you need stronger chemical action to break down accumulated coatings. This process takes time and effort that proper product selection would have avoided.
Temperature and Humidity Affect Drying Patterns
Hot, humid conditions slow water evaporation, giving minerals and soap more time to settle on tile surfaces. Cold temperatures create similar problems by preventing complete drying. The environmental conditions during cleaning significantly impact residue formation.
Running air conditioning or fans during floor cleaning helps water evaporate uniformly. Better air circulation prevents minerals from concentrating in specific areas as puddles slowly dry. You’ll see fewer white spots and streaks when floors dry quickly and evenly.
Avoid cleaning floors on extremely humid days when possible. The moisture in the air competes with floor drying, extending the time water sits on tiles. This extended contact period allows more mineral deposits to form as water eventually evaporates.
Prevention Strategies That Actually Work
Installing a water softener eliminates hard water problems at the source. Softened water contains fewer minerals, dramatically reducing white residue regardless of your cleaning technique. This investment pays off across all household cleaning tasks, not just floors.
Using distilled water for your final rinse provides a mineral-free finish. You don’t need distilled water for the entire cleaning process—just that last pass makes a significant difference. A gallon of distilled water costs under two dollars and covers substantial floor area.
Microfiber mops absorb more water than traditional string mops, reducing the amount of moisture left on floors. Less water means fewer minerals deposited as that water dries. The improved absorption also helps remove more cleaning solution during rinsing.
Regular maintenance cleaning prevents the heavy buildup that requires strong cleaning solutions. Light, frequent cleaning needs less product and less scrubbing. This gentler approach naturally produces less residue than intensive deep cleaning sessions.
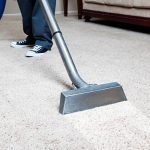
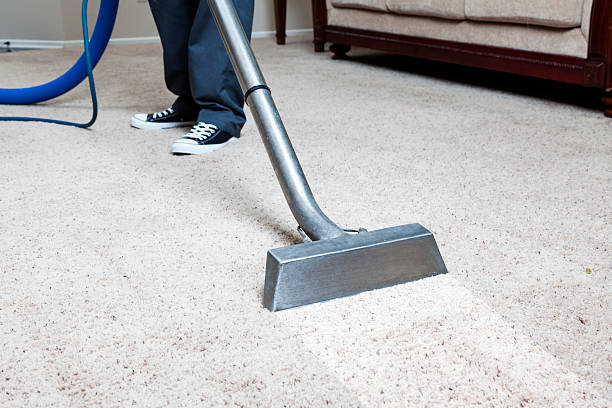
Professional Equipment Makes a Measurable Difference
Commercial extraction equipment removes water and cleaning solution far more effectively than residential mops. These machines spray clean water while simultaneously vacuuming up the dirty water and dissolved residue. Nothing gets left behind to dry as white film.
Professional-grade cleaning solutions also contain chelating agents that bind to minerals and prevent them from depositing on surfaces. These specialized formulas cost more but deliver residue-free results that consumer products struggle to match.
High-powered drying systems remove moisture before minerals can settle. The combination of extraction and rapid drying essentially eliminates the conditions that create white residue. This explains why professionally cleaned tiles look clearer than DIY results.
For more helpful home maintenance guides, check out additional resources on everyday solutions that make household tasks easier and more effective.
Frequently Asked Questions
Can white residue damage my tiles permanently?
The residue itself won’t damage tiles, but acidic cleaners used to remove it might. Mineral deposits and soap films sit on the surface and can be removed with proper techniques. However, repeated use of harsh chemicals to fight residue can etch or dull certain tile types, especially natural stone.
Does vinegar remove white residue from tile floors?
Vinegar can remove mineral deposits on ceramic and porcelain tiles because its acidity dissolves calcium and magnesium. Never use vinegar on natural stone, marble, or limestone—it will etch these surfaces. For hard water residue on compatible tiles, a 50/50 vinegar-water solution works, but requires thorough rinsing afterward.
How often should I deep clean tiles to prevent buildup?
Most homes benefit from professional deep cleaning every 12-18 months, with regular maintenance cleaning weekly or bi-weekly. High-traffic areas need more frequent attention. The key is consistency—light, regular cleaning prevents the heavy buildup that requires aggressive products and creates more residue problems.
Why does residue appear in some areas but not others?
Uneven drying causes spotty residue patterns. Areas with better air circulation dry faster, leaving less time for minerals to deposit. Low spots where water puddles show more residue because water concentrates there as it evaporates. Your mopping technique also affects distribution—overlapping strokes deposit more cleaning solution in certain areas.
Will a steam mop prevent white residue on tiles?
Steam mops reduce residue by using less water and no cleaning chemicals. The high heat also helps water evaporate quickly. However, if you have very hard water, you might still see some mineral deposits. Steam mops work best for regular maintenance rather than removing existing heavy buildup or stains.


Leave a comment